Sunday, February 13, 2011
Thursday, February 10, 2011
Lover's Dream Tagger's Scrapkit


Well its be awhile since i made a new tagger's kit
im a little rusty and im not really happy with it
but im hoping to find it a good home.
No Drop Shadow On The Tubes
Kit Contains
4 heart Frames
3 Papers
1 heart accesory
Down Load the kit here
http://www.4shared.com/file/RQ2O4nMw/Lovers_Dream_Scrapkit.html
Just copy and paste the Link To Your Browser
Posted by Melissa at 3:23 PM 210 comments
Labels: Tagger's Kits
Wednesday, February 9, 2011
--Secret's Are A Girl's Best Friend
http://www.eroticartistgallery.com/Home.htm
Please bear with me...
Ill explain it as best as i can...Feel free to ask for help if needed.
Fonts Of Choice
1 Artist Of Choice
But 4 Tubes
Toadies Blast em
and my Supplies
I am using The wonderful art of Barbara Jensen
Cant Give Link due To AC
Or you may substitute any artist
The supplies for this tutorial are my own and you may download them Here
http://www.4shared.com/file/57801437/3a12392b/Secrets_are_a_girls_best_friend_tut.html?dirPwdVerified=fe02e672
Now let's get started...
Open a 600 by 600 canvas
Open my frame in psp
New layer
Click inside the frame in the white and selections modify expand by 2
and flood fill with a paper of choice from my kit. Selections none.
now you can delete all the white frame layers.
Click inside the frame and then selections modify expand by 2 new layer
and copy and paste tube Place tube in postion then selections invert and delete on keyboard
Move tube layer under frame layer
repeat these steps for the next 2 frames.
Now hide all 3 tube layers Add new layer click inside frame 1 with magic wand selections modify expand by 2
and fill with color of choice from tube. Select none...unhide that tube and move it between the fill and your frame...
do this for the other 2 frames
so by now you have srating from bottom to top
Background layer
Fill 1
Tube 1
Frame 1
Fill 2
Tube 2
Frame 2
Fill 3
Tube 3
Frame 3
Now hide everything except you 3 frame layers (X out)
Merge these together and move to top and duplicate
and Toadies default settings and move this layer under
all layers except your background layer,
name it toadies frame.
This part is entirely optional...but i thought my tag needed something so i added a mask
New rayster layer under Toadies frame layer flood dill it with color from your tube
layers load mask...apply mask and invert.
Now merge group on mask layer.
Grab your main tube and place her by copying and pasting as new layer.
Take my bow and resize by 85 % and palce it under your main tube layer add a dropshadow to frame, tubes, bow...
do not drop shadow your mask or totadies frame layers.
add all copyrights and liseces and your done.
Add all © Info , your name
crop or resize and sharpen and save as j-peg.
Now you are done.
I hope You could follow this tut.
all comments and results are always welcome.
All tutorials are done by my own design...Any similarity is purely coinincidental.
Supplies were either made by me or shared through groups...If you see something of yours please let me know and I will be happy to give you credit
for it
Thanks for Trying my Tutorial
Melissa5931 
http://www.tutorial-writers-inc.com/
"Assembled By Melissa5931"
Posted by Melissa at 8:30 PM 0 comments
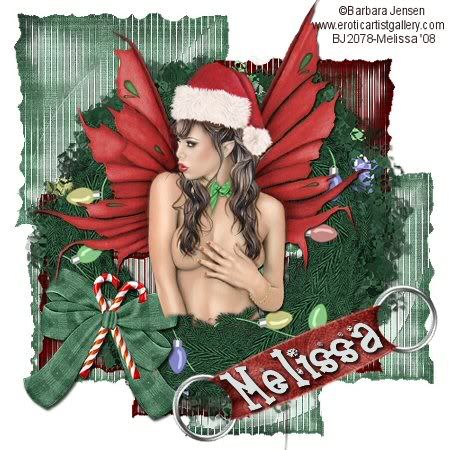
Barbara Jensen-Country Christmas Day
Please bear with me...
Ill explain it as best as i can...Feel free to ask for help if needed.
Fonts Of Choice
Mask Of Choice
1 Artist Of Choice
Xenofex 1-Origami
and The Scrapkit From Cyrene's Site
Scrapkit is a FTU and can be found at
http://graphicillusions.yuku.com/topic/126
Kit Is Called Country Christmas Day By Cyrene
I am using The wonderful art of Barbara Jensen
Who Gave us this wonderful Free tube For Christmas
You may buy a liscense at her site
www.eroticartistgallery.com
Or you may substitute any artist
Now let's get started...
open a 500 x 500 canvas we will resize later...
Unzip The Kit
Open Cyrene's christmas paper 5 ( I used the Green one)
and resize it and then copy and pasted it as new layer.
add mask of choice- Merge group
I have duplicated my mask layer a total of 3 times
and then merged them togetherto make it darker.
Now grab your wreath and copy and paste as new layer,
place it to the left side
of your tag, duplicate it
and resize the original
by 115 percent or to your liking.
and then on original layer apply xenofex 1 origami
to your tube 2 times.
Fold Times-6
Random Seed 50 and second time
random seed 65
add drop shadow to your liking.
add your tube and postion it like mine and add a drop shadow.
now open the bow number 1 and palce it on your canvas as new layer
Then resize it to your liking and place it over on the left side.
Add a drop shadow of choice.
Now duplicate your tube move the duplicated one behind the wreath...
erase parts of the tube like mine to make it look like she is standing inside the wreath.
add the eyelet of your choice and then use your deform tool to postion it the way you like it.
add your name inside the eyelet.
Note: I also duplicated the mask layer and resized it by 85% mirrored it and recoloured it
for an added something to my tag.
Add all © Info , your name
crop or resize and sharpen and save as j-peg.
Now you are done.
I hope You could follow this tut.
all comments and results are always welcome.
All tutorials are done by my own design...Any similarity is purely coinincidental.
Supplies were either made by me or shared through groups...If you see something of yours please let me know and I will be happy to give you credit for it
Thanks for Trying my Tutorial
Melissa5931 
http://www.tutorial-writers-inc.com/
art by Barbara Jensen
www.eroticartistgallery.com
Posted by Melissa at 7:33 PM 1 comments


